KEY AREAS: Lats (thickness), Middle and Lower Traps, Rhomboids
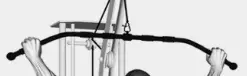
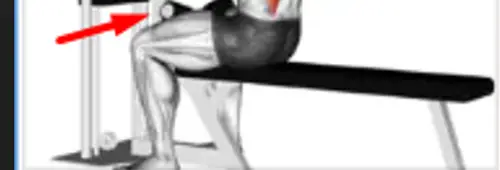
START POSITION: Sit down beneath a cable machine after already attaching your chosen type of bar. adjust the machine weight to match your ability. Then grab the bar as shown and sit down, allowing your own body weight to assist you in pulling down the bar as you sit. Follow through as you sit down to pull the bar to the top of your chest and keep your chin up, looking straight forward. Secure your thighs so that they do not lift up as the bar goes up.

NOTES: Start with just one practice rep and use this to make small adjustments to the position of your grip, your legs and feet, and bum. All the work must be done by your legs, arms and shoulders. No legs. Think zero legs. Plant them.
You can reduce stress on your shoulders by tilting your head upwards gradually as the bar moves upwards, and then slowly tilt your head back again to the start position. Try to follow the centre of the bar with your eyes.
Let the bar pull back up nice and steady and controlled. If the weights crash down loudly at the top position then you probably need to adjust the seat height to be lower. If the weights crash at the lower position, then try raising the seat level. No jerking movements – keep it flowing smoothly and not too fast. If you are big and tall, then it may just be that this machine is not suitable for someone of your size, and I advise against using this type of equipment, because your Range Of Motion (ROM) will be restricted. This leads to very bad FORM, and the MOJOH METHOD is all about STRIVING FOR PERFECT FORM. Breathe in as you go up, and out as you go down. It helps get a good stretch on the back muscles if you let the weight give your arms a little stretch at the top position, but to do this safely, note that it is imperative that your legs are firmly secured (like in the photo).
It’s not difficult for me to classify this exercise as one of the most important exercises that anyone can do. If I was only allowed to do one gym exercise for the rest of my life then it would be something like this one. There is a strong correlation between PULLDOWNS and PULLUPS, because they essentially work exactly the same muscles (mostly BACK). PULLUPS (and PULLDOWNS) work multiple muscle groups at once, including BACK, ARMS, and SHOULDERS. They are also a great way to build FUNCTIONAL STRENGTH and overall body CONTROL and COORDINATION.
If you are lucky enough to have an ‘Assisted Pullups’ machine in your gym then this is the best option to choose. Few people are actually strong enough to pull up their own bodyweight using a solid bar suspended way above their head (these are bodyweight PULLUPS). The assisted pullup machine usually has an adjustable ‘plate’ or platform on which you can kneel or stand, depending on what exercise you are doing. Or you can fold away the plate and switch to ‘bodyweight exercises’. Bodyweight exercises are simply ones that involve lifting or pulling using the weight of your own body rather than using isolated dumbbell exercises or machines with cables and pullies and adjustable weights. This type of exercising is also called CALISTHENICS. I am a strong supporter of this type of training.
So, however you decide to do your PULLUPS (overhead bar) or PULLDOWNS (Cable and pulley machine), the next thing to learn is the different types of handgrip and what they mean.
Firstly you should know about underhand, overhand and neutral grips. These types can be mixed up in order to engage and work different muscle groups of the back, arms and shoulders. But for the Mojoh Method, I use and teach only the fundamental grip/bar/arm combinations:
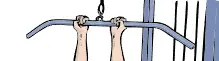
UNDERHAND GRIP Chiefly used for Close Grip and Narrow Grip Pulldowns/Pullups. Also known as Supinated Grip. (see image)
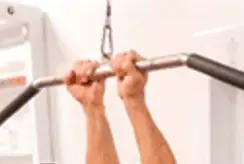
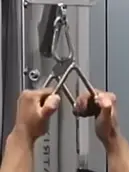
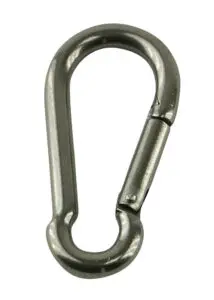
NEUTRAL GRIP This requires a special V-shaped accessory, known as a V-Bar which is attached to a cable machine using a Carabiner clip (see image).
The Neutral Grip is the best grip to use for Narrow Grip pulldowns/pullups, because it gives the most concentrated muscle engagement whilst keeping unwanted stresses away from shoulders, neck and elbows. There’s also a wider bar attachment that is used for a wider Neutral grip. If you have access to this piece of equipment then you should use it. Neutral Grip is always best for people who have Shoulder issues or other physical issues. However, if you are injury free then you should always ‘mix up’ all these grips and exercises, and experiment, and don’t forget that whilst Narrow and Close Grip exercises are often easier, you still need to do the Wide Grips whenever possible (but often less weight is required when using a Wide Grip). Remember to always tuck in your elbows when doing the Neutral Grip because this promotes better Back muscle engagement.
My best advice is to keep the weights down very low when you are experimenting with your hand grips to see what feels better for your physique and fitness level. Build the weight gradually, and don’t be afraid to mix up the grips and exercises from time to time to reduce the risk of overuse injuries. This is because the action of doing any exercise repeatedly with the same movements and with only a slight FORM imperfection WILL sooner or later result in a fairly severe overuse injury.
For example, runners who repeatedly run on flat hard surfaces with poor FORM (this might even be where one leg is longer than the other leg) will eventually suffer from a Stress Fracture (usually around the shin area of the leg).
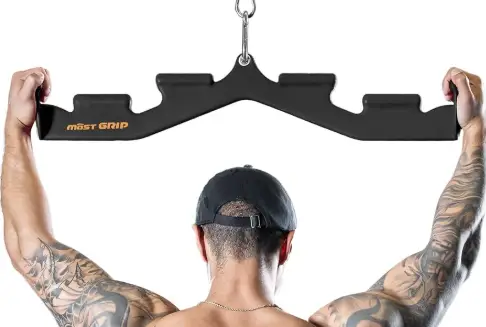
Pronated Grip (also known as Overhand Grip)
This is the standard grip used when grabbing a gym barbell to push up the bar above your head with Shoulder Presses, and for doing Upright Rows, where you lift the bar up from hip level to chest level. It is the best grip (actually the only grip) to use for Wide Lat Pulldowns. Using a Supinated Grip for Wide Lat Pulldowns will put a crazy amount of stress on your wrists and other areas – don’t do it. The Pronated Grip Wide Pulldown is probably the best Lats exercise you can do anywhere. If you aim to get that classic tapering V shape to the shape of your Back, then you quite simply cannot skip this exercise! For most people, especially beginners, I recommend just doing a mix of 2 (max 3) types of pulldowns. Start with the narrow supinated grip pulldowns because these are a great warmup to engage back and arms and shoulders in one compound exercise. If time, also do some supinated close grip.
Then, after the close/narrow, switch to a pronated wide bar grip (overhand grip). I always do these first in my Back warmup (but relatively light weights with high reps)). After that I do bigger and mefium Back muscle exercises and lastly do the smaller Back muscles with exercises like Reverse Flys and Hyperextensions.
Supinated Grip (also known as Underhand Grip, Reverse Grip)
For Close Pulldowns, you can use either a Pronated or Supinated Grip. Although a Neutral Grip is best for this exercise if you have access to the right equipment. Just a quick and simple change of hand grip can drastically influence the outcome and effect of PULLUPS/PULLDOWNS.
There is often confusion amongst people as to the different meanings of all these different grips and positions. The most common confusion is made between the Close Grip and Narrow Grip. Let me clear up the confusion. The Narrow Grip is VERY narrow. The Close Grip is actually where the hands are gripping somewhere above the shoulders, usually slightly wider than the shoulders. So it mean that the hands are positioned closer to the shoulders than the Wide Grip, and the Narrow Grip refers to where the verticals of the arms are actually sloping inwards thereby bringing the hands very close together. Confused? Don’t worry, most people are 🙂